


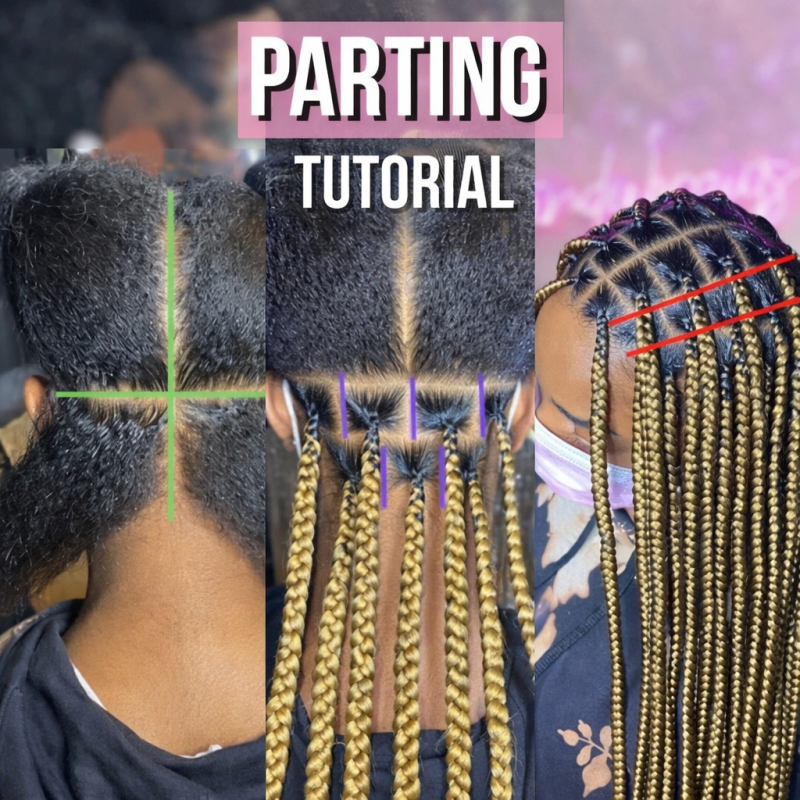
Creating flawless box braids begins long before the first strand of hair is braided. The true foundation of a neat, long-lasting style lies in precise parting. This Professional Box Braids Parting Tutorial: How to Achieve Perfect, Salon-Quality Sections will guide you through the essential techniques used by experienced braiders to achieve clean, symmetrical, and beautifully aligned sections.
Whether you’re a beginner practicing at home or a stylist aiming to refine your craft, mastering the art of parting ensures your braids look polished, balanced, and professional.
What Is Box Braids Parting?
Box braids parting refers to the method of dividing the hair into neat, square-shaped sections before braiding. These sections determine the overall appearance, symmetry, and fullness of the final hairstyle. A well-executed parting pattern especially the brick layering technique creates a natural, fuller look by preventing visible scalp gaps between braids.
Why Proper Parting Matters
Precise parting is essential for several reasons:
- Professional Finish: Clean sections give braids a salon-quality appearance.
- Even Distribution: Balanced parts ensure consistent braid size and tension.
- Longevity: Proper sections reduce tension on the scalp, helping the style last longer.
- Fuller Look: Brick layering minimizes visible scalp, enhancing volume.
- Client Comfort: Accurate parting prevents unnecessary pulling or uneven weight.
Essential Tools and Products
Using the right tools makes a significant difference in achieving crisp and defined parts.
Must-Have Tools
- Rat-tail comb: Ideal for creating straight and precise lines.
- Hair clips or sectioning clamps: Keep sections organized and out of the way.
- Mirrors: Help maintain symmetry across the head.
- Spray bottle with water: Keeps hair manageable during parting.
Recommended Products
- Edge Control: Helps define and hold clean part lines.
- Shine and Jam: Provides grip and smoothness for easier braiding.
- Edge Wax (e.g., Mary’s Edge Wax): Adds extra hold, especially for natural or coily hair.
These products work together to keep sections neat and manageable, ensuring a polished result.
Step-by-Step Guide to Perfect Box Braids Parting
1. Create the Foundation Sections
Start by dividing the head into four main quadrants:
- Front to Back: Part from the center of the forehead to the nape of the neck.
- Ear to Ear: Create a horizontal part across the crown, ensuring it aligns with the client’s ears.
These foundational parts act as a roadmap for the entire braiding process. Ensuring they are straight and balanced is crucial for overall symmetry.
2. Establish the Rows
Once the quadrants are set:
- Begin at the nape of the neck, working upward.
- Divide the hair into evenly spaced horizontal rows.
- For medium box braids, most heads will typically have five to six rows, though this may vary depending on head size and desired braid thickness.
Pro Tip: After parting each row, twist or clip it aside to keep it organized and prevent interference with other sections.
3. Achieve Crisp, Clean Parts
To create sharp and defined sections:
- Use a rat-tail comb to outline the desired part.
- Apply a small amount of edge control directly along the line.
- Re-part the section to smooth stray hairs into place.
Combining edge wax with shine and jam provides extra grip and prevents natural hair from curling back into the part, ensuring long-lasting precision.
4. Implement the Brick Layering Technique
The brick layering pattern is the secret to achieving a fuller and more natural look. Instead of stacking braids directly on top of each other, each braid in a new row is positioned between two braids from the row below.
How to Create the Pattern
- First Row: Start by placing a braid directly in the center of the head, then add evenly spaced squares on each side.
- Second Row: Increase the number of squares so that each new braid falls between the braids below.
- Continue Alternating: Repeat this staggered arrangement throughout the head.
This technique reduces visible scalp and enhances the overall density of the braids.
5. Pre-Part Each Square
Before beginning the braiding process:
- Divide each row into individual square sections.
- Apply a small amount of edge control to each square.
- Twist or clip each section to maintain organization.
Pre-parting ensures consistency in size and prevents miscalculations in the number of braids.
6. Final Alignment and Adjustments
As you approach the crown and front sections:
- Check alignment to ensure each braid falls neatly between the ones below.
- Adjust the size of squares if necessary to accommodate variations in head shape.
- Remember that slight alignment differences near the top are normal and do not affect the final appearance.
Brick Layering vs. Traditional Parting
| Feature | Brick Layering | Traditional Grid |
|---|---|---|
| Fullness | Creates a fuller appearance | May reveal more scalp |
| Symmetry | Staggered and natural | Straight but sometimes rigid |
| Professional Appeal | Highly preferred in salons | Suitable for basic styles |
| Longevity | Distributes tension evenly | Can create tension points |
| Visual Impact | Soft and seamless | More uniform and structured |
Common Mistakes to Avoid
Even experienced stylists can encounter challenges. Here are common pitfalls and how to prevent them:
1. Uneven Foundation Parts
- Problem: Crooked initial sections lead to misaligned braids.
- Solution: Take extra time to ensure the first two parts are perfectly straight.
2. Inconsistent Square Sizes
- Problem: Uneven braids affect the overall look.
- Solution: Pre-part each square and measure visually before braiding.
3. Insufficient Product Use
- Problem: Frizzy or unclear parts.
- Solution: Apply edge control or wax sparingly for crisp lines.
4. Skipping the Brick Pattern
- Problem: Visible scalp and less volume.
- Solution: Always stagger the placement of braids between rows.
5. Ignoring Head Shape
- Problem: Misaligned sections near the crown.
- Solution: Adjust square sizes to suit the natural contour of the head.
Real-Life Example: Medium Box Braids
Imagine a client requesting medium-sized box braids for a protective style lasting several weeks. By creating six evenly spaced rows and applying the brick layering technique, the final result appears fuller and more balanced. The client enjoys a comfortable installation, minimal scalp visibility, and a style that maintains its neatness over time demonstrating the effectiveness of precise parting.
Expert Tips for Salon-Quality Results
- Work in Good Lighting: Enhances visibility for straighter parts.
- Maintain Consistent Tension: Prevents discomfort and ensures longevity.
- Use a Mirror for Symmetry: Helps verify alignment across the head.
- Communicate with the Client: Confirm desired braid size and density beforehand.
- Practice Regularly: Precision improves with experience.
Why This Technique Supports Healthy Hair
Proper parting is not only about aesthetics—it also promotes scalp health. Evenly distributed sections reduce excessive tension on individual follicles, minimizing the risk of breakage and traction alopecia. This aligns with professional hairstyling standards and reinforces trust with clients.
Conclusion: Mastering the Art of Box Braids Parting
Achieving salon-quality box braids starts with mastering the foundation precise and intentional parting. This Professional Box Braids Parting Tutorial: How to Achieve Perfect, Salon-Quality Sections provides the essential knowledge needed to create clean, symmetrical, and beautifully aligned braids using the brick layering technique.